Showing posts with label Tutorial. Show all posts

Thursday, July 26, 2012

Tutorial: What's easier to edit? Overexposed or Underexposed?

What is the point of editing a photo to be correctly exposed? It's because we just took a photo that is good in many ways, but the light is way to bad. Too dark? Too bright? Don't even know? Look here.
So, what can you do to a photo that is overexposed or underexposed? Edit it! That's the best you can do, since you've taken the photo already. And it's probably the only good shot compared to the rest of your shots. But, even though you can edit it, I prefer editing the exposure on an overexposed shot mainly because it will darken the whole shot, and it won't add any noise to the processed shot.
So here's an overexposed shot:


I prefer using Lightroom 2 over Photoshop because it's quicker and easier to process compared to Photoshop. And I could easily import my photos into the album and edit them. 


So this is the edited version of the overexposed shot. It's a shade darker, and there's less flare on Toad's green cap. The details on the cushion are also easier to see. The sky outside is also bluer, with less flare dulling the colour.

Now onto the underexposed shot. The main subject is dark. It's lacking detail, the sky is dominating the photo, and yeah, you can't really see Toad.

So here's the edited version. Toad has brightened up and the cushion has the details. The sky has been exploded with  light, and you can't even see it. But what is the real problem in this picture? It's the noise. There's far too much noise on Toad, and the cushion, and it's just gross. That's the problem with editing an underexposed shot. 
Let me explain. When a picture is taken, the light hits the sensor, turning it into the pixels. So, if majority of pixels are dark, when you brighten them, they will go bright, but will cause discolour in them.

So what's the best type of exposure to edit? My personal preference would be the overexposed shot. It has less noise, and it keeps and adds details to the shot.
There are a few ways in trying to nail the exposure correctly in any situations and they are (come on, add some drum rolls):

Buy a D4.
Use a tripod.
Use flash.
Tell your friend to stay still.

And here's a nailed pic

Sunday, July 1, 2012

Tutorial: Overexposed VS Underexposed

So what's the difference between an overexposed and underexposed photo? The difference is that one is too dark, and one is too bright. Being that in the photo, some details are lost because of the dark or light pixels, which beams out, destroying all that detail.
A lot of people always ask me why I always use flash in my photography. Many people nowadays doesn't need to do this, but I do, because my camera isn't very good at handling high ISO levels, so about 400ISO, it starts being very noisy. If you don't know what I mean by noise, see here. So I tend to use my flash to at least expose it properly, otherwise, I've just a whole bunch of noisy photos to deal with at post processing time.
So lets see what's the difference between the two and how to tell:
This is an underexposed photo. It loses all the details in the dark parts like the shadows. And even to the eye, it's too dark. This is caused by a fast shutter speed, or a small aperture, or a low ISO.


So let's relate that to each one to this photo.
With shutter speed: it's too fast, and didn't get enough time to expose the sensor to the light.
With aperture: it is too small. The opening of the lens is not wide enough to let enough light in.
With ISO: it was too low, and it didn't have enough of them going out to bring the light in.


This is an overexposed photo. It has lost all the details in the bright bits, and basically it's TOO BRIGHT! This will kill your eyes, if it's in the full size.


Shutter speed: It's too slow. It took too much light in, and the shutter speed could be adjusted to be quicker.
Aperture: It's too big, the opening of the lens too every speck of the light and threw it into the sensor. 
ISO: It's too high, it put too much out collecting too much light.


So here's a photo that is nicely exposed. The blacks are not too black, and the whites aren't too white. It's good.


NEXT TUTORIAL:
But having said that overexposing and underexposing is bad, there is ways to edit it, and which one is easier to edit? Keep an eye out for the next coming post! 

Saturday, April 28, 2012

Tutorial: ISO

What is ISO?
ISO is the abbreviation of International Organisation of Standardisation.What does this have to do with taking photos? I have absolutely no idea. I'm just going to tell you how it affects your photos.

How does it work?
During the day, there are different types of brightness. This affects the sensitivity of the image sensor.

How is it measured?
It's measured in numbers and they normally double up from the previous number, so it starts of at 100, then 200, 400, 800 etc. Some cameras have different maximum ISO's and my camera only goes up to 3200, so all the example will be based on my camera, but the concept will be the same with yours definitely.
By increasing the number, the camera will be able to receive more light in less time. The way I perceive is like this: In 1 minute, I want to get 5 litres of honey. I first start with 100 bees, and that is not enough. I try with 200 bees, and that is enough to get me 5 litres of honey.
Does that make sense? Let's put it back into the camera concept. If I wanted to take a shot with dim lighting, and I wanted to keep the shutter speed at 1/50, I would need to put the ISO at 400. I hope that makes sense now.

PROs and CONs
Pros: Able to choose a fast shutter speed to freeze movement.
Cons: Noisier shots.

What do you mean... Noisier shots?! Are you saying my photos are going to make sound?!
Ummm... No. No matter what you do to your photos, they will not make sound by themselves. Noise is what is classified as grains or colour distortion. The higher your ISO is, the grainier it gets and it will affect the quality of the photo.

Monday, April 23, 2012

Tutorial: Aperture

What is Aperture? Aperture refers to the size of the diameter inside the lens.

So how does it work? Every time you take a shot, there is an opening at the lens, which opens up to allow light to enter the sensor. For each shot you take, the opening closes for the photo.

How is it measured?
It's measured in f-stops, and it is shown like this: f/number, e.g. f/1.4. The smaller the number the bigger the lens are open. Moving from one f-stop to the above or below, is halving or doubling in number and size, which means it's letting in either more or less light into the sensor.

How does this element affect photos?
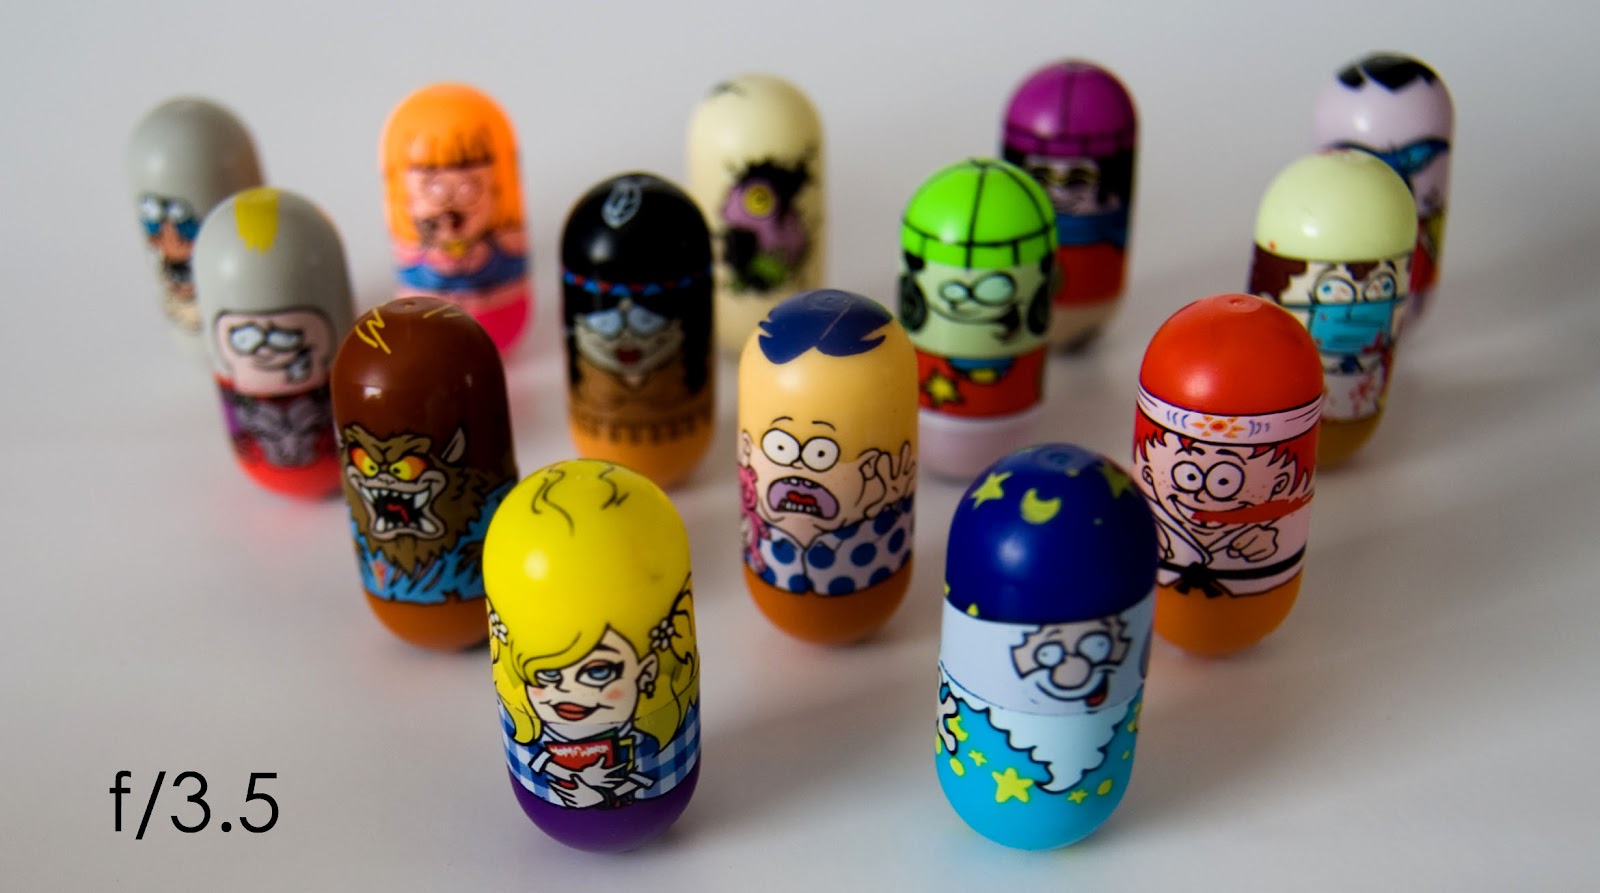
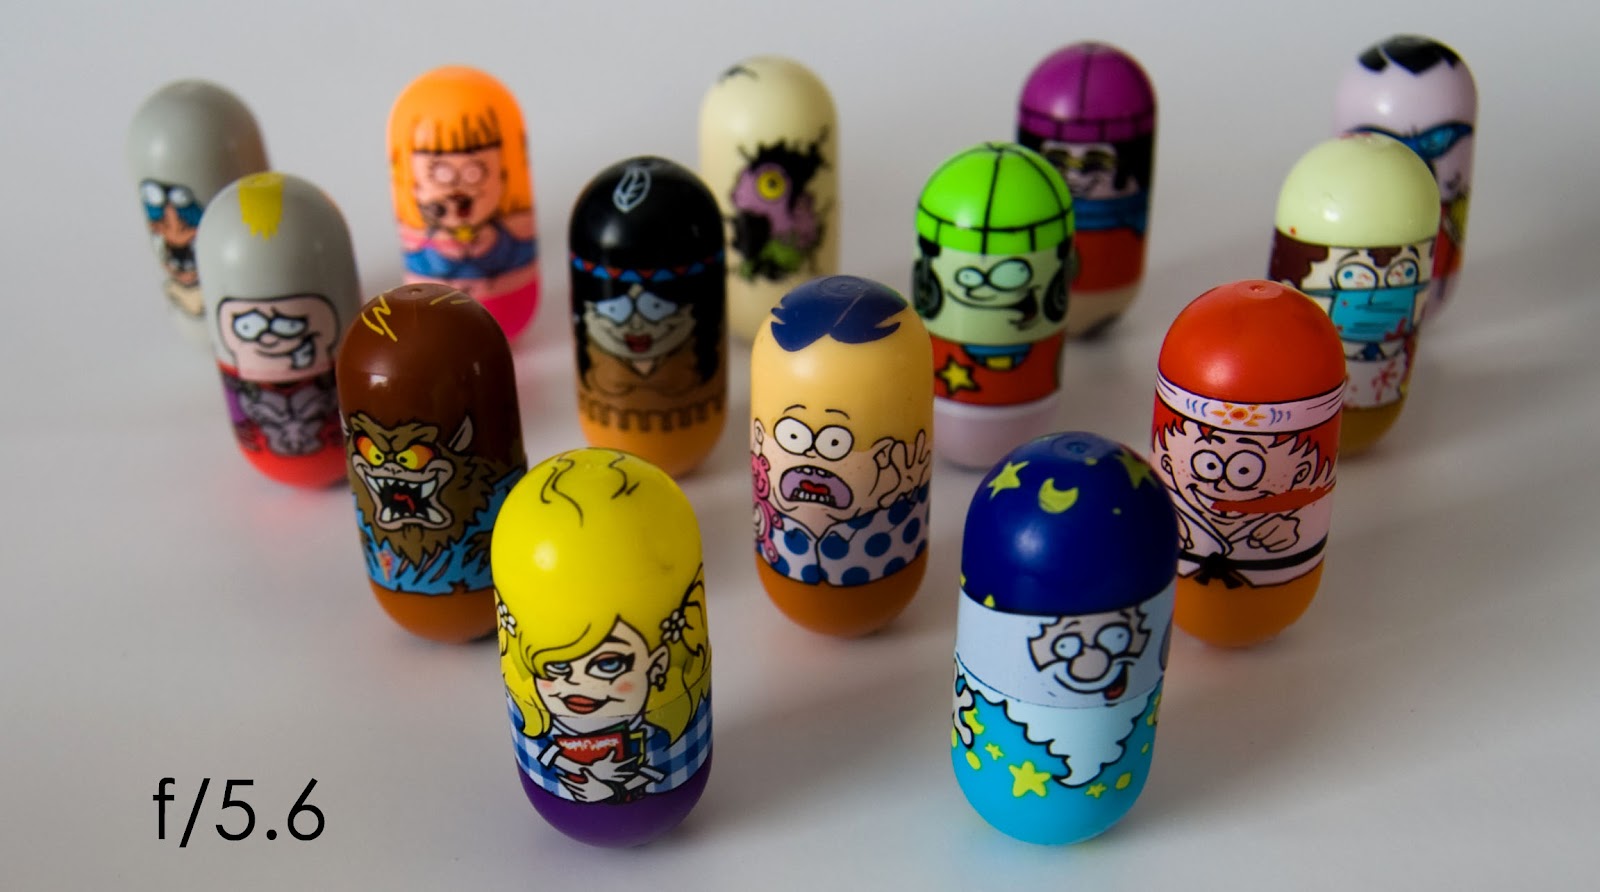
By letting in less light (small f-stop, e.g. f/16), it will show more of the shot in focus. By letting in more light (large f-stop, e.g. f/3.5), it will put most of the shot in blur, keeping the selected part (chosen by you) in focus.

At f/3.5, only the first row is in focus


At f/5.6, the first row is in focus, and the second row is starting to become sharp


At f/8.0, the second row is in focus, and the third row are beginning to become sharp, figures are recognisable


At f/16, third row is in focus, and the fourth row is starting to come sharp


At f/22, everything on the shot is in focus. All detail is on each figure.

Tutorial: Exposure

After photographing for about 4 years, I have learnt many, many things. From the time I was using Auto Mode, switching into different modes (portrait, night, etc), then gradually changing to the semi-manual then the fully manual modes. So because I'm such a "nice person", I decided to share my knowledge for newbies or people who just need to remind themselves about their basics.

So let's just start with the easiest of all, exposure or shutter speed.
What is exposure?
Exposure is basically the term used for the amount of time the shutter is open for the light to hit the sensor. So the longer you leave it open for, the more light it receives.

How is it measured?
It is measured in seconds or fractions of seconds. The bigger the number, the longer it is open. So logically speaking 1sec is longer than 1/50sec.
Every shutter speed has their purpose to it. There is no right or wrong in choosing it, as it just depends on what shot you plan to make.
Even though there is not much rules to this key aspect, there are a few rules that you should keep in mind.
For any shutter speed lower than 1/50sec (e.g. 1/6, 1/3 etc...) you should use a tripod or some kind of support to avoid camera shake. Even if you don't have a tripod or anything cameras are coming out with built-in image stabilisation which helps stop camera shake up to a few stops down.

How can I effectively use it?
Well, here's a question you should ask yourself. Do you want to freeze movement? Do you want to show motion?
Freeze movement: For this option, you will want to use anything faster than 1/750sec. This also depends on how fast the subject is moving. So have a judge before you do anything.
Show motion: Anything under 1/200. Even though 1/200 is quite quick of a shutter speed, the subject can be blurred depending on how fast it is travelling. So again, judge on what your subject is, and how fast it is travelling.


At the speed of 1/250 of a second, you could see some blur, but you can still see the shape of the cylinder. But at the speed pf 1/6 of a second, all you can see is blur, and obviously after that, it just get's blurrier.